Showing posts with label refinishing. Show all posts

Sunday, April 6, 2014

My Cedar Chest Found a Home

Last summer I found an old Lane Cedar Hope Chest at a garage sale and I had to snatch it up.  It was in pretty rough shape, but we cleaned it up, took the sander to it, re-stained it and made it look like new.  You can read my original post about this work-in-progress here.

Last week we took the chest down to the lake house and it's now in the front room....


I always wanted a Lane cedar chest so I was very excited to get this one.  It's all the more special because I waited so long for it and because I refinished it myself.  I know I'll get years of use from it and it's spot at the lake house is the perfect place for it to be.

Monday, December 2, 2013

Tool Chest Re-do

This week I have a tool chest re-do project to share with you.  The tool chest was left in the garage by the previous owners of our lake house.  Believe me when I tell you it looked like an old piece of crap laying in the corner.  We kept tossing tools in it and I never gave it a second thought until Chablis looked at it over the summer and said she thought she'd like to re-finish it.  Damn, why didn't I think of that first???  The only before picture I took was this.  The entire tool chest looked like this before she started on it....


Chablis removed an old hinged shelf from the interior, removed the hardware handles, filled in all the holes, and sanded the entire thing down....


Then she painted it with a couple of coats of blue paint...


She gave it a very light distressing and now the tool chest sits at the end of her bed and holds a blanket and some pillows....


She said one of these days she's going to stencil something on the lid.


I think she should stencil Mom on it and give it to her mother.  What do you think??


Thursday, October 3, 2013

Refinished Desk and Chair Set

If you remember, Chablis and I have slowly been making our way through a huge pile of discarded furniture that we picked up all summer.  We've been refinishing everything under threat of my husband who wanted his garage space back.  I honestly don't know why he'd be bothered by a garage full of junk treasures that was piled so high he couldn't even get our lawn mower in there....  I showed you 2 cedar chests that we re-did a couple of weeks ago here.

Our latest refinishing project was a desk and matching chair.  She picked up both pieces for free.  I'm telling you, having a pick up truck and offering to take things off of peoples hands is a big advantage.  You can't beat a deal like that!

First up is the desk, which had an attached shelving unit.  You can see how scratched up and filthy dirty it was but it was sturdy and well built.  We immediately took the whole thing apart, sanded down the rough edges and some awful looking decals and gave it a good washing....


Chablis decided on a 2 tone color palette, topped by a thin layer of stain and a light distressing afterwards.   We did a final coat of furniture wax and this is how it turned out...


The chair that came with the set was originally in bad condition as well.  Pretty awful looking, huh?


Chablis echoed the taupe color of the desk for the chair paint, did a light stain and distressing and finished with a final waxing....


Here's the finished set together....


Another project out of the way and a few more feet of garage space for my hubby.  Everyone is happy!

Join me over at Obsessive and Creative.

Wednesday, September 25, 2013

Identical Vintage Desks

The other day I was blog hopping and I clicked on a blog named Creative Southern Home because this picture of her refinished desk caught my eye....


Nice looking desk, right?  Sturdy, great lines, beautiful coloring and I did a double take because hey, that looks like my desk!!  What do you think?


So here's a funny story.  Anne over at Creative Southern had recently bought her desk and refinished it for her daughter.  You can read her story about it here.   At about the same time, I was out hitting garage sales when I came across this well loved beauty....


My desk had a garage sale price tag on it for $ 50.00 that was marked down to $ 40.00 and was then repeatedly marked down.  By the time I got there and showed interest in it, it was marked down to 10 bucks and when the old woman saw we had a truck, she begged me to just take it - for free!    :-)   Oh, was I giddy - what a deal!!  I practically clapped my hands and did a jig but I refrained myself.   Honestly, I fell in love with that desk at first sight, even though it was pretty beat up and missing one handle that I later found stuffed in the drawer.  The thing that sold me on the desk was the cool metal plate on the top drawer that read Chicago Office Furniture Company.  Since I'm from Chicago that sealed the deal!  Into the back of the truck she went.  The desk - not the old lady.


We took her home and I removed and stained the drawers inside and out and fixed that broken handle. 


Then I gave her a complete light sanding and a good staining all over and finished up with a couple of coats of Poly U.  On the top of the desk there was a couple of bubbly spots and cracked veneer.  I really didn't want to sand them down too far and then have to mess with fixing that veneer. 


Since I'm keeping this desk for myself and taking it to the lake house for my desk top computer, I decided to just put some old maps on the top of the desk.   I copied some maps from my map book, burned the edges and then smeared them with a little ash to age them a bit.  Then I took mod podge and glued them down and once they were dry I sprayed them with 2 coats of an acrylic sealer.


After that I covered the desk top with 4 more coats of poly U.  So here's the finished version of my desk complete with strategically placed maps which won't bother anyone who is writing anything.  I have empty spots at the top right and left corners where the computer and my printer will go.  I probably could have skipped the whole map gluing process and just laid maps on top of the desk and covered the whole thing with a sheet of glass, but I really didn't want to spend the money for the glass.


I was telling Anne at Creative Southern Home about my desk and she suggested we run a dual post about our dueling desks.  Isn't it fun how we met over a shared passion for refinishing furniture and it turned out to be the same piece of furniture and we are in completely different states?  Stop by, check out her blog and say hi!

I can't wait to get my desk down to the lake.  It's going to be awesome in my sunroom.  I'll be sure to take pictures and post them when that finally happens.

I'm linking up at Obsessive and Creative and Sunny Simple Life.

Thursday, September 19, 2013

Refinishing 2 Cedar Chests

Chablis and I have slowly amassed quite the varied collection of furniture that we wanted to refinish.  We've been hitting garage and yard sales all summer and our garage is overflowing.  Crammed to the rafters with so much furniture in fact, that Louie finally told me that we had better start working on some of this stuff and get it out of there.  I gave him the sad face and before I knew it, a new storage shed was erected in the yard and all the furniture was moved out of the garage.  Chablis and I staged everything out in the yard to decide what we wanted to start on first.  Let me tell you - there is a lot of stuff!

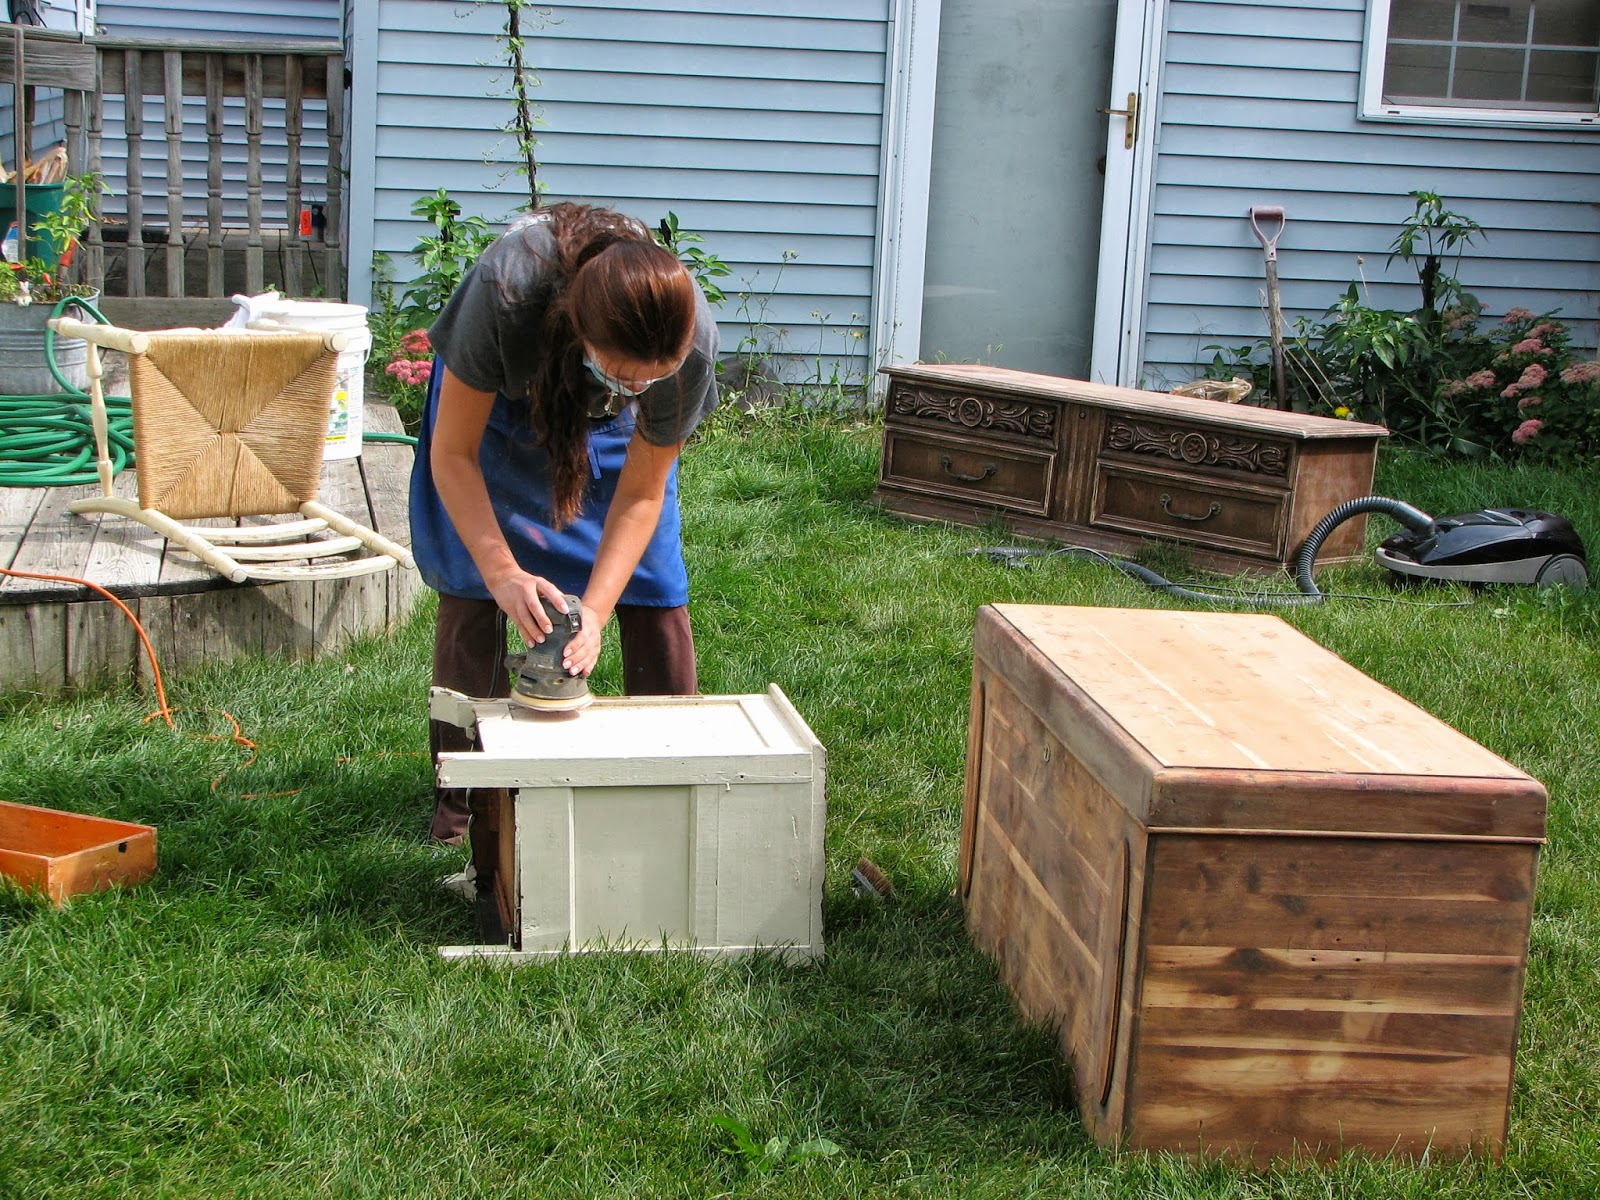
With the weather forecast calling for a few days of cool temperatures and sunny skies, we decided to tackle a couple of projects this week.  We decided that the 2 cedar chests were first on the list to be done, because we could easily store other stuff inside them once they were finished.  Smart idea, huh?

I decided to tackle this Lane Cedar Hope Chest.  Other than being severely scratched and badly water stained, it was in really good shape.  All the wood was sturdy and intact.  I gave it a good sanding down and also removed and cleaned the hardware handles.


Chablis had finagled  negotiated a really good price on this antique cedar chest and she couldn't wait to start on it.  This one was in really bad shape.  It had several cracks in the wood, missing moldings, rusty hardware and really dirty all over.


Since we had the sander out, we decided to sand down several other projects right away as well.  After all, if everything was going to get saw-dusty, we might as well get that out of the way...


After the sanding we gave everything a good vacuuming and a thorough wash down...


My son had also just asked me to find him a small dresser for his room.  I picked up this one for free!  He didn't care for the wood finish, so I sanded it down and then he asked me to paint it dark brown.  If you look closely in the background you can see my new shed that is still crammed with lots more stuff to work on....


Here's his finished dresser.  Plain, I know, but it was exactly what he wanted....


Here's what the finished Lane Cedar Chest looks like.  Based on the serial number stamped on the bottom, I think it was made in October of 1974.   I don't know what I'm going to do with it yet but it sure is beautiful!

**  I wanted to add this after- the- fact discovery.  I contacted Lane Furniture and asked about background information on this chest.  I got an almost immediate response: " It was from the CACHE collection by Lane. Mounted on Hidden casters and made out of Oak veneers and had a dark oak finish.  It was also identified as being made in 1974."  I'd like to thank Susan B. over at Lane for helping me find the correct information on my chest.  I'd also like to highly recommend the Lane Company - they go above and beyond for their customers!  **


Chablis was thrilled with how her Cedar Chest turned out.  She put a ton of work into it.  She had to repair a crack in the bottom, removed a lot of the crappy trim and really cleaned up the hardware.  Then she stained it.  I love the color and the natural dents and dings.  It has a lot of character.  She said she's definitely keeping hers.


 The original hardware looks amazing!


We got railroaded by rain the last 2 days so our projects got put on hold.  We have lots more to finish up before winter hits and it's too cold to work outside any more.  Unless I give my husband the stink eye and worm another shed out of him to work in.  Hmmmm.........

I'm joining Craft Frenzy Friday at Obsessive and Creative and Sunny Simple Life's From the Farm Blog Hop.  Stop by and say hi!
Related Posts Plugin for WordPress, Blogger...